Snowflake Serenade Supply List
This class is open to ALL machine quilters!
Snowflake Serenade Yardage Amounts
Because of the many different sizes of class projects for this class, the Fabric Requirements are listed in a pdf file.
To view the Snowflake Serenade Fabric Requirements pdf file Click Here
Piecing: You will need basic sewing supplies and basic sewing/quilting skills to piece the quilt top.
This project uses a LOT of Flying Geese Units. If you have a special tool that you use to make Flying Geese, you will need it for this project.
Thread: Use what ever type of thread you and your machine are comfortable working with. Use as many colors of threads as you want on this quilt.
Other items you may want to have on hand to make your quilting easier
- 6 x 24 inch quilting ruler to make straight registration lines, or any other straight edge ruler that fits the workspace of your machine
- safety pins for pin basting - we will be using a few safety pins for this project
Quilting: The quilting for this class is ALL FREE HAND. We are going to make registration lines - a LOT of registration lines - to mark our quilting design!
You will need a marker that you are comfortable using on a quilt top. I recommend the Mark B Gone, water soluble (blue) marker on light fabrics and a Chalk O Liner with Miracle Chalk powder in it for dark fabric. I also like using Crayola Fine Line Washable Markers.
Please note that the Crayola markers wash out with detergent and warm water. The Crayola Fine Line Washable markers can be found at nearly every office supply store and many other stores including most grocery stores. A package of 8 markers is usually less than $5.
I use the Crayola markers only on my own quilts, NEVER, EVER on a customer quilt!
If you would like to practice your quilting before stitching, I HIGHLY RECOMMEND that you get a piece of clear Plexiglas that will fit in the workspace of your quilting machine. (Plexiglas of this size should be about $10 or less.)
Before using the Plexiglas, take either masking or duct tape (which now comes in many different colors) and place it over the cut edges of your piece of the Plexiglas. The tape serves two purposes. 1) It protects the edges of the Plexiglas. Sometimes the edges can be a little sharp and could scratch you or tear the quilt. 2) The tape will also make a boundary or edge around the Plexiglas. This will prevent you from drawing off the edge of the Plexiglas.
You will then use markers - I recommend the Vis-a-Vis markers, available at all "big box" office supply stores, for marking on the Plexiglas. (Note: the Vis-a-Vis markers usually have 4 in a package and cost less than $10.) The marker is removed using a damp paper towel. See below left.
For marking on Plexiglas on top of dark fabric, I have found that the Expo Bright Markers work very well. See below right.
Both of these markers can be purchased in major office supply stores such as Staples, Office Depot, Office Max, etc. They can also be purchased online.
Click on any photo for a larger view and slide show
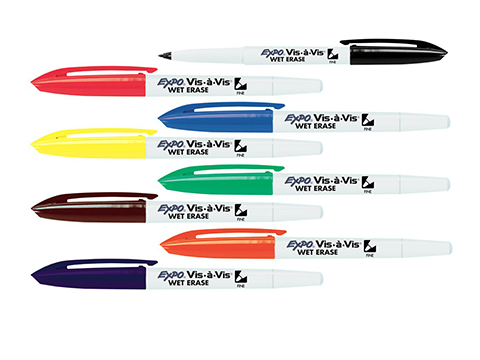
Vis-a-Vis Markers

Expo Bright Stick Markers
REMEMBER this is a LEARNING project! This project does not need to be perfect. World peace does not depend on perfect piecing or quilting!!
Back to Class Information Page